Jul 1, 2016
Thai Spring Rolls
I love Thai food. Can't explain why, but whenever possible, I'll eat Thai. <3 p="">
My first taste of Thai food was in 1990 in the Flavors and Spices restaurant in Alabang Town Center. We had Chicken in Pandan Leaves, Seafood with Hot Basil, Tom Yum Goong and Thai Spring Rolls.
Since then, I've tried replicating what I ate in our kitchen. Since basil and the ingredients of Tom Yum weren't readily available back then, my first replication success was with Thai Spring Rolls.
PS: I think, now that I have eaten Vietnamese Spring Rolls, that the two are very similar, if not one and the same. :)
THAI SPRING ROLLS
What's In It?
100 g sotanghon (vermicelli) noodles
20 g taingang daga (woodear) mushrooms, soaked in warm water until soft
100 g togue (mung bean sprouts), washed and drained
1 small carrot, peeled and julienned
100 g ground pork
3 cloves garlic, mashed
1 small onion, peeled and sliced
2 T oil for sauteing
2 t brown sugar
2 t fish sauce
pinch of ground black pepper
20-30 lumpia (spring roll) wrappers
cornstarch slurry
2 c oil for deep frying
Kitchen Conjugations:
Soaked sotanghon in water for 15-20 minutes or until they become soft. Drain water and cut sotanghon into 4-inch lengths. Set aside.
Over medium heat, saute onions and garlic in oil. Add in pork and stir fry for 2 minutes or until pork loses its pinkish tint. Add in sotanghon, taingang daga, carrots and togue. Stir fry for one minute. Season with brown sugar, fish sauce and ground black pepper. Remove from fire.
To the ingredients, add in the sotanghon. Stir. Check and adjust seasonings if necessary.
Now, assemble the spring rolls.
1. Put a tablespoon of the filling at the center but about three inches from one of the edges of the wrapper. Spread the filling out to form a small log.
2. Fold the edge nearest to the filling over it, ensuring there is no gap between the filling and the fold.
Then fold over the right and the left edges over the filling, again keeping the roll tight..
3. Roll the folded edge towards the other end of the wrapper, making a cylinder, stopping about two inches from the other edge.
4. Brush the space/gap with a little cornstarch slurry to moisten it then continue to roll the cylinder over it to close the roll.
5. Do this for the rest of the filling and wrappers.
Time to fry!
Heat the cooking oil in a wok or deep fryer. Fry the rolls in batches of 5-6 to ensure they are fully submerged. Cook until they are golden brown. Remove from the pan and stand rolls over a cooling rack or colander to drain oil.
Serve immediately with sweet chili sauce as dip.
3>
Jun 18, 2016
Bacon Potato Salad
You know we like a certain food item so much when it gets replicated in my kitchen. Siempre because it would be too costly and cumbersome to keep going back to a certain restaurant to get your fix of that favorite, di ba?
Pancake House's Warm Bacon Potato Salad is one such favorite of ours. My second son still orders it everytime we come to dine in Pancake House, but it's still a delight that I can whip up a batch anytime the craving kicks.
Pancake House serves this salad warm, maybe because it's freshly made and hadn't had time to chill. But it still tastes great at room temp and even chilled.
BACON POTATO SALAD
What's In It?
500 g potatoes
1 medium yellow onion, peeled and minced
100 g bacon, fried to a crisp, drippings reserved
1 cup mayonnaise
1/4 cup Dijon mustard
salt and pepper to taste
Alfalfa sprouts (for garnish)
Kitchen Conjugations:
Wash potatoes well and cook in boiling water until fork tender. Remove from fire, drain water and set aside potatoes to cool.
Break bacon into bits. Set aside.
In a salad bowl, make the dressing by combining mayonnaise and Dijon mustard. Add in about a teaspoon of bacon drippings and the minced onion. Add a pinch of salt and pepper and stir to combine. Do a taste check of the dressing, adding a little more salt or pepper if needed. Set aside.
Cut the unpeeled, cooked potatoes into chunks, and combine onto the mayo-mustard dressing. Toss to coat well, adding the bacon bits.
Serve on a bed of lettuce garnished with alfalfa sprouts and more bacon bits. Enjoy!
Labels:
Salads
Jun 17, 2016
Birthday Boy's Bento Box
This is my version of the Kiddie Meal, served in my youngest son's birthday party in school last year.
Buying party meal packs from Jollibee or McDonalds would have been simpler and less taxing for me, but I went the DIY route because:
1) I wanted to serve smaller portions, because I saw how kids often had leftovers from JB/MD packs, and
2) I had wanted a meal-lootbag-souvenir in one, to simplify distribution, and of course, to cut down on costs.❤️
I also think the Bento Box is a practical souvenir, one that can be used and reused long after the party is over. To personalize it, I scanned the lid to get the actual size of the stickers I need to make to cover the existing ones, and made my own on Photoshop.
What's In It?
I wanted to make the contents as colorful and kid-friendly as much as possible as I do not want any of the food to go to waste.
Based on the reactions of the kids (and the teachers), the birthday bento box idea is a success. :)
Buying party meal packs from Jollibee or McDonalds would have been simpler and less taxing for me, but I went the DIY route because:
1) I wanted to serve smaller portions, because I saw how kids often had leftovers from JB/MD packs, and
2) I had wanted a meal-lootbag-souvenir in one, to simplify distribution, and of course, to cut down on costs.❤️
I also think the Bento Box is a practical souvenir, one that can be used and reused long after the party is over. To personalize it, I scanned the lid to get the actual size of the stickers I need to make to cover the existing ones, and made my own on Photoshop.
- Homecooked Spaghetti with Meat Sauce, with star-shaped cheddar cheese
- Jelly-marshmallow strips that I shaped into an M, my son's initial
- Cocktail hotdogs
- Chocolate and jelly cups
- Ham and cheese mini-sandwiches
I wanted to make the contents as colorful and kid-friendly as much as possible as I do not want any of the food to go to waste.
Based on the reactions of the kids (and the teachers), the birthday bento box idea is a success. :)
Jun 10, 2016
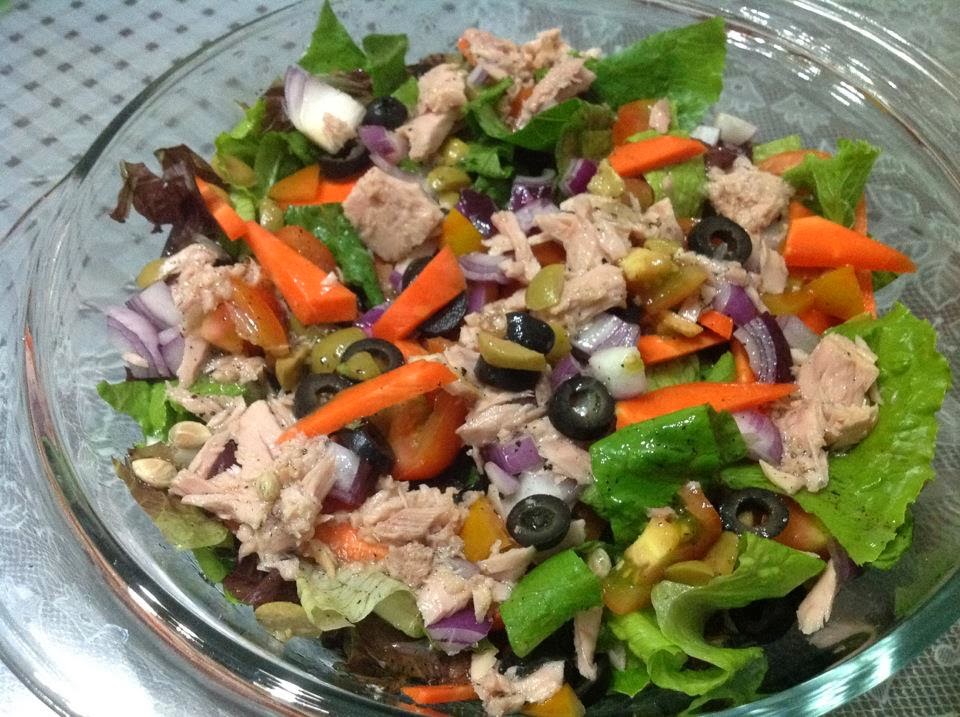
Tuna Garden Salad
My mom comes home from Australia for a vacation every two years and stays with me. As she misses Filipino food and I miss her, we make up for lost chances by indulging in what she likes. When she leaves, she leaves with excess poundage, but is not worried, confident that she'd easily lose the weight because she won't be indulging in Aus as much as she did back here.
Meanwhile, ako, not as lucky.
So in attempt at a 'Balik Alindog' program, I'm trying to eat light dinners such as this.
TUNA GARDEN SALAD
What's In It?
For the Salad:
3 cups shredded mixed salad greens (Romaine, Lola Rossa, Iceberg lettuce)
1 small carrot, peeled and sliced into thin wedges
1/8 cup black olives, pitted and sliced
1/8 cup green olives, pitted and sliced
2 salad tomatoes, halved and sliced into wedges
1 small red onion, peeled and diced
1 can tuna flakes in brine
For the dressing:
1/2 cup extra virgin olive oil
1/4 cup apple cider vinegar
1 teaspoon ground black pepper
1 tablespoon Knorr seasoning
2 teaspoons honey or brown sugar
Kitchen Conjugations:
Wash and dry salad greens; transfer to a serving bowl. Garnish with the other salad ingredients.
In a separate bowl, combine ingredients for salad dressing, stirring well to ensure the sugar is dissolved.
Pour dressing onto salad and toss.
Labels:
Healthy,
Salads,
Vegetables
Jun 9, 2016
Pizza Muffins
I originally made these pizza muffins as part of the menu for my youngest son's 3rd birthday party in school.
I had wanted something popular with kids, something that's already portioned and easy to distribute, and something that can be in kid portions.
I got the recipe from an issue of Yummy magazine, and tweaked it to suit my taste.
I think these pizza muffins are also good as baon for both schoolers and their parents. :) It's also a quick snack you can whip up if you have surprise guests, or something your kids can make by themselves. :)
What's In It?
2 cups flour
1⁄4 cup sugar
1 tablespoon baking powder
1 teaspoon salt
1 teaspoon Italian seasoning
1⁄2 teaspoon baking soda
1 cup cheddar cheese, cubed
1 cup sour cream (1 cup milk with 1 teaspoon vinegar)
2 eggs
1⁄4 cup butter, melted
1⁄2 cup bell pepper, finely chopped
1⁄2 cup sweet-style pizza sauce
1⁄2 cup shredded quickmelt cheese
Toppings: Small slices/bits of Italian Sausage, Salami and Ham
Kitchen Conjugations:
- In a medium bowl, whisk together sour cream, eggs and butter until smooth.
- Add in flour, sugar, baking powder, salt, and baking soda. Stir until all the flour and sugar have dissolved.
- Stir in cheese cubes, Italian seasoning and diced bell pepper.
- Spoon mixture into muffin cups, until three-fourths full.
- Spoon a tablespoon of pizza sauce on top of each muffin, top with shredded cheese and other toppings of choice.
- Bake at 200C for 15 to 20 minutes, until golden and a toothpick inserted in the center of the muffins comes out clean.
- Cool on on a wire rack and remove from molds.
I bought these disposable foil tins from Japan Home, P88 for a pack of 12 tins.
Labels:
Baked Goodies,
Party,
Pizza,
Snacks
Jun 7, 2016
Starbites Cake Pops
One night in April 2014, apart from the Espasol, I also made Brownies...but from a mix. I don't know why, but while I followed the box instructions to the letter, the brownies didn't turn out as I expected...they were more 'cake' than brownies...more crumbly than fudgy. Fail!
So I crumbled the cake, stuffed it into silicon molds and turned it into cake pops. Presenting...'Starbites.'
You could do the same for stale cake and similar cake fails. :) I think this is a good idea for kiddie parties or bring-to-school goodies to share. It's also a quick pop-in-the-mouth sweet tooth craving. :)
What's In It?
Two pouches of Triple Chocolate Brownie Mix + water + vegetable oil + 2 eggs, mixed and baked according to package directions.
Multi-colored M&Ms or Nips
Kitchen Conjugations:
Crumbled the cake and pack them into silicon molds. Refrigerate for at least 30 minutes to allow the cake pops to set.
Unmold and top with M&Ms.
I think this would also be a good base for a Rocky Road cake pop. :) For that you only need to put marshmallows and nuts and maybe drizzle with sugar glaze.
So I crumbled the cake, stuffed it into silicon molds and turned it into cake pops. Presenting...'Starbites.'
You could do the same for stale cake and similar cake fails. :) I think this is a good idea for kiddie parties or bring-to-school goodies to share. It's also a quick pop-in-the-mouth sweet tooth craving. :)
What's In It?
Two pouches of Triple Chocolate Brownie Mix + water + vegetable oil + 2 eggs, mixed and baked according to package directions.
Multi-colored M&Ms or Nips
Kitchen Conjugations:
Crumbled the cake and pack them into silicon molds. Refrigerate for at least 30 minutes to allow the cake pops to set.
Unmold and top with M&Ms.
I think this would also be a good base for a Rocky Road cake pop. :) For that you only need to put marshmallows and nuts and maybe drizzle with sugar glaze.
Labels:
Baked Goodies,
Cakes,
Chocolate,
Occasions,
Party
Jun 6, 2016
Bacon and Egg Breakfast Cups
My brothers and I attended a school that was a 30 to 45-minute drive away. But because we rode the school bus which had to pick up several other students, we had to be ready to go by 5:30 am. That meant our mom, who also had to go to work, had to be up as early as 4am to make breakfast, our baon and also to get ready for work. On many days we simply took our breakfast with us and ate on the ride to school.
I look back on those days as, coincidentally, the new schoolyear starts today for most students in the country. Portable breakfasts like this are important for schoolers and workers on the go. However, it's also a great brunch served with a salad, as a savory snack or as an appetizer.
BACON AND EGG BREAKFAST CUPS
What's In It?
6 Bread slices, ends removed
1/4 cup melted butter
6 bacon slices
6 eggs
Italian seasoning
1/8 cup cooking oil
*Other things you'd need:
6 large aluminum or glass muffin cups
Round cookie cutters
Oven/oven toaster
Kitchen Conjugations:
Preheat oven to 150-200C. Prep muffin cups, brushing the sides with cooking oil.
Dip the bread slices into the melted butter to soften them. Cut into circles so that they fit the bottom of the muffin cups. Line the muffin cups with the round bread slices.
Line the sides with bacon. Crack one egg into the space in the middle and sprinkle a little Italian seasoning.
Bake in the oven for about 5 minutes or until the eggs are cooked and set.
Bon Apetit! :)
Labels:
Appetizers,
Bacon,
Breakfast,
Eggs,
Occasions
Jun 2, 2016
Stir-fried Sirloin with Snowpeas
Because I've not been using my BPI Express Online account often enough, I've forgotten my password and had to reset it, and to activate the new password, I had to go to the nearest ATM and perform the activation.
Getting there I found that all the parking slots near the ATM were taken, and the only vacant slot was that reserved for Fresh Option customers. So it was two things -- either kapalan ko ang mukha ko and park even if I was actually going to the ATM, or buy something from the Fresh Options meatshop.
I suppose you know what happened. And that's where I got the sirloin for this recipe.
STIRFRIED SIRLOIN (BEEF) WITH SNOWPEAS
What's In It?
500 g sirloin, cut across the grain into 1.5" x 0.5" strips
3 T oyster sauce
3 T light soy sauce
2 T rice wine
5 T cornstarch
2 T brown sugar
1.5 t ground black pepper
1 t sesame oil
1 medium onion
half a head of garlic
3 T cooking oil (for sautéing)
1/2 cup water
200 g snow peas
Kitchen Conjugations:
Prepare marinade by mixing oyster sauce, soy sauce, rice wine, brown sugar, black pepper and sesame oil. Mix in sirloin strips and cornstarch, blend well. Set aside and allow to marinate for at least 20 minutes.
Wash snowpeas and remove ends. Set aside.
Peel and slice onions. Peel and mash garlic. Set aside.
Heat water in a wok or frying pan until it boils. Drop and blanch the snow peas for half a minute. Remove from pan and set aside.
Drain water from the pan and add cooking oil. Over medium heat saute onion and garlic for about 2 minutes. Turn up heat then add in marinated sirloin, stir a little and cover to allow the beef to cook, for about 2 minutes. Uncover and turn the beef slices to allow the other side to cook. Cover and leave to simmer for 2 minutes.
Stir then check seasonings. Adjust if necessary. Add in snow peas, stir a little to allow some of the beef drippings to coat the pods for half a minute. Remove from fire and serve hot.
Best enjoyed with steamed rice. :)
Getting there I found that all the parking slots near the ATM were taken, and the only vacant slot was that reserved for Fresh Option customers. So it was two things -- either kapalan ko ang mukha ko and park even if I was actually going to the ATM, or buy something from the Fresh Options meatshop.
I suppose you know what happened. And that's where I got the sirloin for this recipe.
STIRFRIED SIRLOIN (BEEF) WITH SNOWPEAS
What's In It?
500 g sirloin, cut across the grain into 1.5" x 0.5" strips
3 T oyster sauce
3 T light soy sauce
2 T rice wine
5 T cornstarch
2 T brown sugar
1.5 t ground black pepper
1 t sesame oil
1 medium onion
half a head of garlic
3 T cooking oil (for sautéing)
1/2 cup water
200 g snow peas
Kitchen Conjugations:
Prepare marinade by mixing oyster sauce, soy sauce, rice wine, brown sugar, black pepper and sesame oil. Mix in sirloin strips and cornstarch, blend well. Set aside and allow to marinate for at least 20 minutes.
Wash snowpeas and remove ends. Set aside.
Peel and slice onions. Peel and mash garlic. Set aside.
Heat water in a wok or frying pan until it boils. Drop and blanch the snow peas for half a minute. Remove from pan and set aside.
Drain water from the pan and add cooking oil. Over medium heat saute onion and garlic for about 2 minutes. Turn up heat then add in marinated sirloin, stir a little and cover to allow the beef to cook, for about 2 minutes. Uncover and turn the beef slices to allow the other side to cook. Cover and leave to simmer for 2 minutes.
Stir then check seasonings. Adjust if necessary. Add in snow peas, stir a little to allow some of the beef drippings to coat the pods for half a minute. Remove from fire and serve hot.
Best enjoyed with steamed rice. :)
Labels:
Asian,
Beef,
Quick,
Snow peas,
Stir-Fries
Aug 2, 2015
Seafood with Thai Basil
I love seafood, I love basil, and I love Thai cuisine. And that's why I decided to make this for dinner last night. :)
SEAFOOD WITH THAI BASIL (PAD KEE MAO TALAY)
What's In It?
1 kg mixed seafood (prawns, halibut fillets, mussels, squid), or 250g of each seafood*
1/4 cup fish sauce
1/4 cup oyster sauce
1/8 cup brown sugar
1 medium red bell pepper, washed, seeded and sliced into cubes
4-6 Thai chilies, washed and sliced lengthwise
1 medium red onion, peeled and sliced
half a head of garlic, peeled and mashed
a handful of holy basil leaves (20-25 pcs), washed and stems removed
3-4 tablespoons cooking oil
cornstarch slurry (3 teaspoons cornstarch dissolved in 5 teaspoons water) -- optional
Kitchen Conjugations:
1. Heat oil in a medium-sized wok or deep frying pan over high heat for 1-2 minutes.
2. Saute onions until soft and translucent. Add garlic, chilies and bell peppers and stir-fry for one minute.
3. Keeping flame on high, add in the seafood, fish sauce, oyster sauce and sugar. Stir fry for 2-3 minutes.
4. The seafood will render water as they cook so the mixture will turn watery. Spoon out excess water, leaving only enough to cover seafood.
5. Check seasonings. Add more sugar, salt or chilies depending on preference.
6. Add in the basil leaves and let the mixture simmer until the leaves wilt a little (about one minute).
7. You may thicken the sauce by stirring in the cornstarch slurry at this point. Simmer with continuous stirring for 30 seconds or until the sauce thickens a bit.
8. Serve with steamed rice. Enjoy!
-----
Notes:
1. I used frozen seafood. If using fresh ones, be sure to gut and process the squid, and peel and devein the shrimp.
2. This recipe works perfectly as well with chicken and pork fillets, or all-prawn, all-mussel, all-squid versions.
3. I like spice, and for me the 4-6 chilies deliver just the right kick. You may however tone the spice level by using only 2-3 chilies or omitting the chilies altogether as the holy basil is also spicy.
4. Do NOT overcook the basil. It will turn black and lend a bitter taste to the dish. In doubt, better to leave it undercooked than overcooked.
5. If you plan to have this cooked way ahead of serving or eating it, or if you will have to freeze and reheat it for later, I suggest you cook this recipe WITHOUT adding the basil, and just add the basil leaves during reheating.
6. Cooking over high temp is crucial because the seafood need to cook quickly so they remain juicy and soft. Overcooking the squid for one will make it tough and rubbery.
Appreciate your comments and questions! :)
Labels:
Basil,
Seafood,
Spicy,
Stir-Fries,
Thai
Aug 18, 2014
Sayote Tops Guisado
As you get older, you tend to shy away from what's complicated and drawn towards what's simple and no-frills. Or am I just speaking for myself?
Anyhow, I found that I no longer drool over fatty, cholesterolic food and crave more whole, organic and healthy fare. I don't know if it's just in my head, but after eating a hearty (read: fatty) meal, I feel battered and really exhausted; which is ironic because food is meant to replenish and energize.
Because of this we've shied away from meat as much as possible and eat more vegetables like Chayote Tops Guisado, or Ginisang Talbos ng Sayote.
GINISANG TALBOS NG SAYOTE
What's In It?
1 bundle of chayote tops, leaves separated from the stalks, hard portions discarded
1 red onion, peeled and sliced
1 large ripe tomato, washed and sliced
5 cloves garlic, peeled and mashed
3 tablespoons cooking oil
diced cooked meat (pork, chicken, beef), fish or seafood (optional)
1 tablespoon oyster sauce
1 teaspoon fish sauce
a pinch of ground black pepper
1/2 to 3/4 cup water
1 teaspoon vinegar (optional)
Kitchen Conjugations:
Wash sayote leaves and soft stalks carefully. Drain excess water then set aside.
Heat cooking oil in a wok or deep frying pan. Saute onions, garlic and tomatoes until tomatoes are wilted. Add in the diced cooked meat. Stir fry for a minute, then add the seasonings: fish sauce, black pepper and oyster sauce.
Stir fry for another minute then add in the sayote leaves and stalks. Stir fry for about 30 seconds then pour in water. Let boil then simmer for one minute. Pour in vinegar if using but DO NOT stir until the mixture boils. Check and adjust seasonings. Remove from fire and serve. Leaves and stalks should still be a little crisp.
Best paired with grilled or fried fish. Enjoy!
----------------------
Notes:
1. I usually use bits and pieces of left-over meat from fried chicken, pork barbecue for stir fries like this. This particular time I used left-over crispy pata.
2. Left-over meat (and sauce) from adobo can also be added to this dish. Doing so will give a new and interesting dimension to the dish.
3. If you want a little kick, go ahead and add a chopped siling labuyo during the saute.
Labels:
Filipino,
Vegetables
Espasol
We had lunch in Tagaytay last Sunday and decided to make a quick stop to buy some beef at the Mahogany market. While we waited for my husband to finish with his marketing, we were approached by some vendors who offered us an assortment of Filipino sweets -- panutsa, calamay, pinipig, ube and espasol. Because we were still busog-lusog from lunch yet I wanted to help the peddlers out, I bought a pack each of the sweets. Then we drove on home.
So it was so much later when we found out that masarap pala 'yung nabili naming espasol and we were so bitin, and it wasn't hard for my son Gabriel to convince me to make some from the recipe I found in the 'net from a long time ago.
So, here it is!
ESPASOL
What's In It?
1 1/2 cups ground glutinous rice flour
1 cup coconut cream
3/4 cup washed sugar (segunda)
1 teaspoon vanilla extract
1/2 teaspoon fine salt
1/2 cup macapuno or buko strips, diced finely (optional)
Kitchen Conjugations:
In a wok, toast the ground glutinous rice flour until light brown over low to medium heat. Set aside.
In another wok or pan, combine the coconut cream, sugar, vanilla extract and salt. Let boil over medium heat, stirring constantly to avoid curdling. Add in the diced macapuno or buko strips, and simmer for half a minute (still stirring continuously).
Measure 1 cup from the ground glutinous rice flour and add it into the coconut cream mixture. Stir to incorporate the rice flour into the mix, until the consistency is like playdough. Remove from heat and set aside.
Take the remaining ground glutinous rice flour and sprinkle it over a tray or plate lined with waxed paper (or banana leaves). Take about 3 tablespoons of the espasol and roll it out into a tube. Cut the espasol tube into smaller cylinders then roll them out over the toasted ground rice flour to coat.
Your espasol is now ready to serve. Enjoy!
Notes:
1. This recipe makes about 15 2-inch cylinders.
2. I made this espasol without buko or macapuno because we didn't have any in the house. It still tasted the same, although I suppose it would have been heaps better had there been macapuno or coconut bits in my espasol.
3. If using sweetened macapuno, reduce sugar a little.
4. If using white sugar, reduce the amount as it is a lot sweeter than washed or brown sugar.
5. I think you can also use toasted coconut flakes (available under the 'Buco' brand in supermarkets) in place of fresh young coconut.
Jul 10, 2014
Korean Chicken Barbecue
My family is big on Korean food. When we dine out, nearby Korean restaurants like Seoul Koreana and Soga Miga are always an option. Kaso, magastos!
So I was happy to find a recipe for Korean Chicken Barbecue in the November 2013 issue of Yummy Magazine:
Kakatakam, 'no? Buti na lang I had all the ingredients called for in my pantry:
And I set out to make it right away for dinner. :) I doubled the recipe found in the magazine so that I have enough for everyone. I also upped the spice by putting more gochujang. :)
KOREAN CHICKEN BARBECUE
What's In It?
1/2 c rice wine
1/4 c soy sauce
6 T gochujang (Korean chili paste -- the red tub in the photo above)
4 T brown sugar
2 T minced garlic
2 T sesame oil
2 T vegetable oil
1 kg. boneless chicken thighs or breasts, sliced into 1-inch thick strips
2 T vegetable oil (for grilling)
toasted sesame seeds or chopped green onions (for garnish)
Kitchen Conjugations:
Make the marinade by combining the first 7 ingredients in a saucepan. Simmer the mixture over low heat until sugar dissolves. Remove from fire and set aside to cool completely.
Marinate the chicken strips in the cooled marinade. Cover and refrigerate for at least an hour; best if overnight.
Heat the 2T vegetable oil in a cast iron grill or heavy-bottomed frying pan. Pan-fry chicken in batches until thoroughly cooked.
Transfer cooked chicken onto a serving plate and garnish with toasted sesame seeds or chopped green onion. Serve with kimchi on the side if desired. Best with a steaming bowl of rice. :)
Mar 13, 2014
Angel Hair with Sea Bass Mediterraneo
Given the chance, my husband will always eat fish. Even when eating out and presented with various entrees, he will choose fish, or that which has fish in it.
At Italianni's, his staple fare is Sea Bass Mediterraneo, pan-seared Sea Bass put on top of pasta, usually angel hair. He was saddened to find then, when we lunched at the restaurant over the weekend that the dish has been taken out of the menu.*
To cure his hang-up and to assure him that it isn't the end of the world yet, I tried replicating Sea Bass Mediterraneo at home. Judging from his grin I think I've guessed the ingredients and procedure pretty
well. :)
ANGEL HAIR WITH SEA BASS MEDITERRANEO
What's In It?
For the pasta:
500 grams Angel Hair pasta, cooked according to package directions
1/2 cup olive oil
5 cloves garlic, peeled and minced
1 large red onion, peeled and sliced
3 ripe tomatoes, seeded then diced
1/8 cup capers (in vinegar)
1/4 cup green olives, pitted then sliced into rounds
3/4 cup white wine
For the fish:
1-2 slices Sea Bass, halved
1 teaspoon fine salt
1 teaspoon ground black pepper
1 teaspoon garlic powder (optional)
1/2 cup olive oil
Kitchen Conjugations:
Season the fish with salt, black pepper and garlic powder (if using). Set aside.
In a non-stick skillet heat olive oil over high heat. Add seasoned bass slices and sear for 1 minute per side or until edges turn light brown. Remove from pan and transfer onto a plate. Repeat until all fish slices have been seared.
Lower heat then add olive oil to start the saute. When oil is hot enough, saute the onions until soft, then add in the garlic. Stir fry for 30 seconds, and add in the diced tomatoes, olives and capers. Stir fry for about half a minute before adding white wine. Let boil then reduce heat to simmer for a minute or two.
Adjust seasonings by adding salt and pepper if needed. Then toss in the cooked angel hair and continue to toss to distribute the sauce for another 30 seconds.
Remove from fire, transfer angel hair onto a serving plate and top with the seared Sea Bass.
Mangia Bene!
-------------------
*We asked the manager why they took the dish out of the menu. She said it was because "Sea Bass is an endangered species." Really? We wager that the real reason was that the dish wasn't as popular as the other items and was costlier to produce/keep in the menu.
Mar 6, 2014
Fish and Tofu Hotpot ala Ho Chai Lai
There's a Chinese restaurant along the National Highway in Muntinlupa City that enjoys a good following despite its 'barest essentials' positioning because of the taste and quality of their food. Ho Chai Lai is almost always packed at lunch time, frequented by people who want Chinese fare beyond the usual dimsum and Filipinized offerings at Chowking. Their bestseller is the Stuffed Squid, squid stuffed with chives, battered, deep fried and served with a special sauce on the side.
When we dine at Ho Chai Lai, my husband and I usually order the Stuffed Squid and this dish, Fish Head Eggplant Hotpot, or the other variant, Fish Tofu Hotpot. My husband likes it so much I've taken it upon myself to replicate it at home, and merging the two variants eggplant and tofu, so that my husband gets the best of both and enjoy the dish whenever he wants. :)
The most recent appearance of this dish on our dinner table was two Thursdays ago, when we had friends over for dinner. I was surprised to find my meat-loving friends loving it, even asking for the recipe. So here it is!
FISH, EGGPLANT AND TOFU HOTPOT
What's In It?
For the Fish:
1.5 kgs Bitilla* (White Snapper, see photo), gutted, descaled and sliced into serving portions
1/2 cup all-purpose flour
2/3 cup water
1 tsp. + 1/2 tsp. fine salt
1 tsp. + 1/2 tsp. finely ground black pepper
1 cup cooking oil, for frying
For the hotpot:
1/4 cup cooking oil, for sauteing
1 large thumb ginger, peeled and sliced in rounds
1 large red onion, peeled and sliced
5 cloves of garlic, peeled and mashed
6-8 large pieces of dried Shiitake mushrooms, soaked in 1 cup warm water for 30 minutes or longer
1 1/2 cups water
1/2 cup oyster sauce
1 Knorr fish broth cube
1/2 cup brown sugar
1/2 cup Chinese cooking wine
2 tablespoons sesame oil (optional)
3 tablespoons cornstarch, dissolved in 1/4 cup water
3 stalks onion leeks, sliced, white part separated from greens
2 medium eggplants, peeled, halved lengthwise then crosswise
half a large block of tofu, cut into 1" squares
Kitchen Conjugations:
Prepare the Fish: Season the fish slices with a teaspoon each of salt and pepper. In a shallow bowl, make a thin batter of the flour, water and season it with 1/2 teaspoon each of salt and pepper. Set aside.
In a wok or frying pan, heat the cooking oil over medium heat. Test if cooking oil is hot enough by dropping bit of the batter, watching for sizzling. When the oil is hot enough, carefully drop the fish slices one by one, leaving enough space between each slice to prevent them from sticking with each other. (Turn heat to high as oil temperature has dropped with the addition of the fish. Turn settings back to low when the oil begins to sizzle again.) Fry the fish slices for about 3-4 minutes each side or until they turn light brown. Remove from the pan and transfer onto a plate. Do the same process for the rest of the fish until all have been cooked.
Make the hotpot: In a hotpot or saucepan, saute the ginger, onions and garlic in hot oil. Stir fry for about a minute, then add in the oyster sauce. Stir fry for about half a minute, then add all ingredients except the eggplant, tofu, leeks and cornstarch slurry. Let boil then simmer for a minute. Check and adjust seasonings, adding sugar, salt or the cooking wine to produce a balance of sweet, salty and tangy.
Add the eggplant slices and let the sauce simmer until they are half-cooked. Then add in the white parts of the leeks, the tofu squares and fried fish slices. Let boil then simmer for about two minutes, before adding the cornstarch slurry to thicken the sauce.
Garnish with the rest of the onion leeks and serve with steamed rice. Enjoy!
----------
*Other fish like Maya-maya (Red Snapper), Lapu-lapu (Grouper) or Labahita (Surgeonfish), may also be used. You can also use fillets, but make a thicker batter (that of pancake batter consistency).
---------
UPDATE: I've replaced the original photo with a new one, this time made more colorful by the addition of carrot medallions. I've also cut the tofu into bigger squares and pre-fried them to make them easier to handle. The fish used in the dish in the picture above is lapu-lapu.
Labels:
Chinese Food,
Copycat,
Fish,
Hotpot,
Stews
Mar 2, 2014
Korean Beef Stew ala Kimchi
People my age would remember Kimchi as a popular restaurant in SM Foodcourt whose specialty is the Galbi Jim, or Korean Beef Stew. Unfortunately though, perhaps with waned popularity and the high cost of leasing and maintaining space in the mall, Kimchi branches have become fewer and fewer, replaced by glamorized 'turo-turos.'
We had friends over for dinner last Thursday and for a treat I decided to make this dish. Initially I considered using one of the recipes I found in Google, but decided winging it, based on what I think should be in it, from the memory of the taste of the dish. (People close to me know that this is how I cook-- approximating flavors from memory.) I think I was able to really come close to the Kimchi recipe. :) I would probably use a different gochujhang (Korean chili paste) brand, next time though, as this one wasn't as spicy as I wanted.
KOREAN BEEF STEW (GALBI JIM)
What's In It?
1 kg. beef short ribs
1 large red onion, peeled and sliced
1 head garlic, peeled and mashed
1 cup Kikkoman soy sauce
1/2 cup brown sugar
1/2 cup Chinese cooking wine
Water
2-4 tablespoons gochujang (Korean chili paste)
1-2 tablespoons sesame oil
Bird's eye chilies (siling labuyo), optional
1 bunch onion leeks, washed and sliced diagonally into 1/2" lengths
Toasted sesame seeds (for garnish)
Kitchen Conjugations:
Wash the beef short ribs in cold water, removing slime and fat. Place them in a stock pot, and add in water to the level just enough to cover the ribs. Boil over high heat for 3-4 minutes.
Remove all scum from the broth. Add in all ingredients except the leeks, sesame seeds and chilies. Let boil some more for about 5 minutes, then lower heat to simmer the dish for about two hours. Yes, that long! Could be longer, if you had the misfortune of buying tough meat...
Check from time to time if you need to add more water. Check and adjust seasonings, too. You may need to add more sugar and/or cooking wine should you opt to add water. Add salt (not soy sauce) for a little more saltiness. Warning: adding more soy sauce instead of salt will make the broth too dark.
You can add the chilies at this point if you find that the chili paste has not spiced things up to the level desired. While waiting you can also slice the onion leeks, toast the sesame seeds and steam some rice. :)
This dish is best cooked till the meat gets to fall-off-the-bones tenderness. Test by poking a piece with a fork. If the tines get through without much effort, the meat is tender enough.
Garnish with onion leeks and toasted sesame seeds. Serve hot with steamed rice and sautéed mung bean sprouts (togue) on the side. Enjoy!
Notes:
1. Do you really need gochujang? Yes, if you want the authentic Korean taste and the reddish tint of the Kimchi resto version. I bought my chili paste from Shopwise. See how it looks like here.
2. Do you really have to use Kikkoman? Yes, or some really good soy sauce. As this is a stew the meat absorbs and retains the flavors of the stewing broth so it is important that you use good soy sauce (and reserve the inexpensive soy sauce for regular fares like Adobo).
PS: Here's a special shout-out to my friend Mark Samson who introduced me to this dish at Kimchi. Thanks, Mark!
We had friends over for dinner last Thursday and for a treat I decided to make this dish. Initially I considered using one of the recipes I found in Google, but decided winging it, based on what I think should be in it, from the memory of the taste of the dish. (People close to me know that this is how I cook-- approximating flavors from memory.) I think I was able to really come close to the Kimchi recipe. :) I would probably use a different gochujhang (Korean chili paste) brand, next time though, as this one wasn't as spicy as I wanted.
KOREAN BEEF STEW (GALBI JIM)
What's In It?
1 kg. beef short ribs
1 large red onion, peeled and sliced
1 head garlic, peeled and mashed
1 cup Kikkoman soy sauce
1/2 cup brown sugar
1/2 cup Chinese cooking wine
Water
2-4 tablespoons gochujang (Korean chili paste)
1-2 tablespoons sesame oil
Bird's eye chilies (siling labuyo), optional
1 bunch onion leeks, washed and sliced diagonally into 1/2" lengths
Toasted sesame seeds (for garnish)
Kitchen Conjugations:
Wash the beef short ribs in cold water, removing slime and fat. Place them in a stock pot, and add in water to the level just enough to cover the ribs. Boil over high heat for 3-4 minutes.
Remove all scum from the broth. Add in all ingredients except the leeks, sesame seeds and chilies. Let boil some more for about 5 minutes, then lower heat to simmer the dish for about two hours. Yes, that long! Could be longer, if you had the misfortune of buying tough meat...
Check from time to time if you need to add more water. Check and adjust seasonings, too. You may need to add more sugar and/or cooking wine should you opt to add water. Add salt (not soy sauce) for a little more saltiness. Warning: adding more soy sauce instead of salt will make the broth too dark.
You can add the chilies at this point if you find that the chili paste has not spiced things up to the level desired. While waiting you can also slice the onion leeks, toast the sesame seeds and steam some rice. :)
This dish is best cooked till the meat gets to fall-off-the-bones tenderness. Test by poking a piece with a fork. If the tines get through without much effort, the meat is tender enough.
Garnish with onion leeks and toasted sesame seeds. Serve hot with steamed rice and sautéed mung bean sprouts (togue) on the side. Enjoy!
Notes:
1. Do you really need gochujang? Yes, if you want the authentic Korean taste and the reddish tint of the Kimchi resto version. I bought my chili paste from Shopwise. See how it looks like here.
2. Do you really have to use Kikkoman? Yes, or some really good soy sauce. As this is a stew the meat absorbs and retains the flavors of the stewing broth so it is important that you use good soy sauce (and reserve the inexpensive soy sauce for regular fares like Adobo).
PS: Here's a special shout-out to my friend Mark Samson who introduced me to this dish at Kimchi. Thanks, Mark!
Oct 11, 2013
Penne al Salsa di Pomodoro e Aglio
Don't be scared of the fancy-sounding name. This is but some fancy macaroni I whipped up using what's in my pantry, which was some leftover Tomato Garlic Dip, good ol' Corned Beef and grated Parmesan. I think this is a good choice if you're short on time and want something quick and easy both on skills and on the pocket.
PENNE AL SALSA DI POMODORO EL AGLIO (Penne in Tomato Garlic Sauce)
What's In It?
500 g. Penne Rigate, cooked according to package directions
200 g. (one jar) of Tomato Garlic Dip
200 g. (one can) of Corned Beef
1 medium onion, peeled and sliced
half a head of garlic, peeled and mashed
3 tablespoons cooking oil
1/8 cup olive oil
1 teaspoon salt
1/2 teaspoon pepper
1/4 teaspoon oregano (optional)
Kitchen Conjugations:
Heat cooking oil over medium heat in a wok or a deep non-stick pan. Saute onions for one minute or until soft and translucent, then add garlic and continue sauteing for about 30 seconds. Add in the corned beef. Stir fry for about a minute, then season with salt, pepper and oregano (if using). Stir in the tomato garlic dip, let boil then bring heat down to let the mixture simmer for one and a half minutes.
Add in the cooked penne. Pour in the olive oil and toss the mixture to allow even distribution and coating. Check and adjust seasonings.
Top with parmesan cheese. Serve while hot.
Note: You can also add sliced mushrooms and finely-diced red bell peppers when the corned beef is half-cooked, then stir-fry for another 30 seconds before adding in the tomato garlic dip.
Labels:
Pasta
Oct 3, 2013
Saucy Breakfast Hotdogs
My mom was the Queen of Up-cycling and Re-purposing. She had mastered the art of 'disguising' and 're-presenting' leftovers so that they are still welcomed at the dining table and eaten with gusto (or unknowingly, hahaha!) such that no food is wasted nor thrown away.

Saucy Breakfast Hotdogs is one such upcycled dish. Its recent outing in our home was in the morning after my little boy's birthday party, because we had leftover cocktail hotdogs and I had a considerable stash of repacked tomato catsup, leftover from take-outs and food deliveries. (That's another habit I got from my mom-- stashing repacked condiments for later, specifically for baon or picnics or anywhere bringing condiments in bottles is impractical.)
Apart from taking away the monotony of fried food, the sauce in this dish acts as an extender, allowing the dish to feed more people, making it a good choice for budget-conscious moms!
SAUCY BREAKFAST HOTDOGS
What's In It?
15-20 pieces cooked cocktail hotdogs or 5-6 pieces cooked regular hotdogs, sliced into 3s
5-6 sachets tomato catsup (or 5-6 tablespoons tomato catsup)
2 tablespoons cooking oil
3 cloves garlic, peeled and mashed
1 small onion, peeled and sliced
1/2 cup water
pepper and salt to taste
Kitchen Conjugations:
Heat cooking oil over medium heat in a wok or deep pan. Saute garlic and onion for one and a half minutes or until the onion slices become soft and translucent. Add in the hotdogs and stir fry for a minute. Pour in the water and the catsup, stir to combine. Let boil then lower heat to allow the mixture to simmer for one minute. Check and adjust seasonings.
Serve hot with steamed rice. Enjoy!
Note: Boiled eggs, peeled then halved or quartered, may be used instead of hotdogs.
Labels:
Breakfast,
Repurposed,
Upcycled
May 30, 2013
Pineapple Upside Down Muffins
Oh wow! I made these muffins and took this picture on March 11, 2008, started this post but never got around to publishing it. Incredible! The little boy in the picture is now a young man! This post is FIVE YEARS late! Now I don't even remember the story behind the making of the muffins. :( Sigh.
What I do remember, judging by the look of the muffins:
1. I had leftover Pineapple Tidbits and decided to use that in addition to the pineapple slices I also had left over.
2. Since I used my trusty Turbo Broiler instead of a conventional oven (because that's all I had back then), some of the muffins rose unevenly, making it hard to turn them upside down.
3. Since I decided to use leftover Pineapple Tidbits I had to scale down by baking the batter in muffin cups rather than a regular cake pan (because the bits would look less pretty on a regular pan than pineapple slices would). Upon closer look I realized that I actually used llaneras for leche flan instead of regular muffin cups.
PINEAPPLE UPSIDE DOWN MUFFINS
What's In It?
CAKE
2 cups all-purpose flour
3/4 cup brown sugar
1/2 cup milk powder (I used Birch Tree)
3/4 teaspoon baking powder
1/4 teaspoon salt
2 large eggs
1/2 cup water
1/3 cup vegetable oil
TOPPING
1 cup brown sugar
3 tablespoons butter, melted
1 can (8 oz.) pineapple tidbits in juice, drained (about 3/4 cup)
9 maraschino cherries, halved
Kitchen Conjugations:
Make the cake by combining the flour, sugar, milk powder, baking powder and salt in large bowl. Add eggs, water and oil. Beat for 30 seconds on medium speed until the cake ingredients are combined well and the mixture is free of lumps. Set aside.
Grease muffin cups, then make the topping: Combine brown sugar and butter in a bowl. Sprinkle 2 teaspoons of the brown sugar mixture into each greased muffin cup. Arrange 4 to 5 pineapple tidbits and 1/2 cherry on top of each brown sugar mixture.
Spoon batter into prepared muffin cups filling up to half of each mold.
Bake in a turbo broiler for 15 to 20 minutes at 250 C or until wooden pick inserted in center comes out clean. Cool for 1 minute. Run knife around edges of the cupcakes; invert onto wire rack(s). Re-position any dislodged pineapple piece. Best served warm.
What I do remember, judging by the look of the muffins:
1. I had leftover Pineapple Tidbits and decided to use that in addition to the pineapple slices I also had left over.
2. Since I used my trusty Turbo Broiler instead of a conventional oven (because that's all I had back then), some of the muffins rose unevenly, making it hard to turn them upside down.
3. Since I decided to use leftover Pineapple Tidbits I had to scale down by baking the batter in muffin cups rather than a regular cake pan (because the bits would look less pretty on a regular pan than pineapple slices would). Upon closer look I realized that I actually used llaneras for leche flan instead of regular muffin cups.
PINEAPPLE UPSIDE DOWN MUFFINS
What's In It?
CAKE
2 cups all-purpose flour
3/4 cup brown sugar
1/2 cup milk powder (I used Birch Tree)
3/4 teaspoon baking powder
1/4 teaspoon salt
2 large eggs
1/2 cup water
1/3 cup vegetable oil
TOPPING
1 cup brown sugar
3 tablespoons butter, melted
1 can (8 oz.) pineapple tidbits in juice, drained (about 3/4 cup)
9 maraschino cherries, halved
Kitchen Conjugations:
Make the cake by combining the flour, sugar, milk powder, baking powder and salt in large bowl. Add eggs, water and oil. Beat for 30 seconds on medium speed until the cake ingredients are combined well and the mixture is free of lumps. Set aside.
Grease muffin cups, then make the topping: Combine brown sugar and butter in a bowl. Sprinkle 2 teaspoons of the brown sugar mixture into each greased muffin cup. Arrange 4 to 5 pineapple tidbits and 1/2 cherry on top of each brown sugar mixture.
Spoon batter into prepared muffin cups filling up to half of each mold.
Bake in a turbo broiler for 15 to 20 minutes at 250 C or until wooden pick inserted in center comes out clean. Cool for 1 minute. Run knife around edges of the cupcakes; invert onto wire rack(s). Re-position any dislodged pineapple piece. Best served warm.
Labels:
Baked Goodies,
Cakes,
Fruits
May 4, 2013
Linagpang Nga Turagsoy
Seventeen years of marriage not only transformed me into a fish and veggie-lover, it also opened me to the Cebuano way of cooking. Which is a good thing, actually, because I easily tire of eating the same things, and I like seeing, tasting and cooking a variety of dishes.
Almost 4 years ago when we vacationed in my husband's hometown in No. Cotabato, we had this soup during one of the lunches and I immediately got hooked. When I asked what it was, they told me it was Turagsoy.
Back in Laguna weeks later, I hankered for the delicate interplay of spice, saltiness and the smoky flavor imparted by the Inihaw na Dalag. So I begged my husband to please find me a dalag, so I can make this soup. I got my wish. :) I made Turagsoy according to how I imagined it to have been done, based on the tastes I remembered.
However, while I came up with something good, I knew there were some flavors lacking and I knew I had to get the recipe and make the real thing. Luckily I eventually had the chance to ask the then-appointed cook, my brother-in-law, who happily gave me the recipe. I realized later though that the recipe he gave me is large enough to feed a large family of 10-12 people, maybe because my husband's family is large. Tee-hee. :)
Wanting to find out more, I tried googling Turagsoy and that's how I found that Turagsoy is actually the Ilonggo term for dalag (haluan in Cebuano), and that this soup is actually an Ilonggo dish called Linagpang nga Turagsoy.
Linagpang/Nilagpang, according to MyFilipinoKitchen is grilled meat soup. It is similar to the Cebuano tinuwa and the Tagalog pesa, but it requires any meat to be put in the soup (fish, chicken or pork) to be grilled first and is spicy.
LINAGPANG NGA TURAGSOY (Grilled Mudfish in Soup)
What's In It?
2 pcs. (approx. 1.5-2 kgs.) mudfish, cleaned
1 large piece (approx 1 kg) milkfish, cleaned
rock salt
6-8 pieces tomatoes
2 large onions, peeled
5 stalks onion leeks, sliced into 2" lengths
1/2 to 1 hand ginger, peeled and sliced into thin rounds
2 large red bell peppers
4-5 bird's eye chili
shrimp paste, to taste
2 liters drinking water
Kitchen Conjugations:
Season the mudfish and milkfish with salt then grill them over hot charcoal until juices run clear. Grill tomatoes and bell peppers until slightly wilted.
Remove any charred portions from the fish', tomato and pepper skins. Slice bell peppers onto bite-size chunks. Cut the fish into smaller portions. Set aside.
In a small bowl, mash grilled tomatoes with the bird's eye chilies (if using). Set aside.
Boil water over high heat. Add in the sliced onions, ginger and bell pepper in a large saucepan and simmer for 5-10 minutes. Add in fish slices, let boil then simmer for 10 to 15 minutes.
Season with the mashed tomato-chili mixture and bagoong or uyap, Add green onions and/or leeks.
Let boil for about 1-2 minutes more, then check and adjust seasonings if needed.
Serve with rice.
--------
Notes:
1. Local names: Dalag/Turagsoy/Haluan (mudfish), Bangus (Milkfish), Alamang/Uyap (Shrimp paste), Labuyo (Bird's Eye chili)
2. Dalag is NOT hito (catfish). Hito has a leaner body than dalag and has more bones making it less suitable for this dish (it is better crispy fried or grilled).
3. The pictures above were taken when I cooked this dish yet without the recipe from my brother-in-law. That explains why the tomatoes appear sliced/quartered in the picture instead of mashed.
4. Some recipes do not call for the tomatoes nor the bell peppers to be grilled. I think that's okay, but grilling the vegetables imparts more flavor and therefore adds dimension to the soup so I'd go with grilling the vegetables too.
May 3, 2013
Som Tam (Thai Green Papaya Salad)
Want something different for your side salad? Try Som Tam (Green Papaya Salad). It's easy, tangy and the ingredients available from the supermarket. It's light on calories and light on the pocket too!
SOM TAM
What's In It?
1 small green (unripe) papaya (about 300 g.), peeled and sliced / prepped for grating
a small bunch of string beans (about 6 strings), cut into 1" lengths
5 cherry tomatoes, quartered
2 tablespoons dried shrimp
5-6 Thai chilies, chopped
juice from 4 pieces of lime (about half a cup)
4 tablespoons brown sugar
4 tablespoons fish sauce
5 cloves garlic, peeled
1-2 tablespoons roast peanuts, coarsely chopped or ground (optional)
a few stalks of coriander, chopped (optional)
Kitchen Conjugations:
Grate the papaya using a cheese grater or a mandolin. Transfer to a deep dish and set aside.
Using a mortar and pestle, crush garlic. Add chilies and pound slightly. Add the string beans and quartered tomatoes, pound slightly to bruise them and release some of their juice into the mixture. Add in the sugar, fish sauce, dried shrimp, lime juice, ground peanuts and coriander (if using). Pound the mixture some more to release juices. Mix using a spoon or spatula to evenly distribute the flavors. Let stand for about two minutes to allow flavors to meld.
Check and adjust taste. Pour the dressing over the grated papaya and toss. Serve as a side salad or as an appetizer. Enjoy!
------------
Notes:
1. Local names for the ingredients: dayap (lime), wansoy (coriander) and patis (fish sauce).
2. Some people are averse to the smell of wansoy. It is highly optional and may be used only for garnish. (So you may add it at the last minute instead of pounding it with the other ingredients.) Wansoy looks so much like Kinchay, but smells and tastes very differently.
3. Ideally, there should be a delicate balance of the sweetness from the sugar, tartness from the lime, saltiness from the fish sauce and spice from the chili. But go ahead and up the ante for one or two of the taste you prefer.
4. A cheese grater will give you either fine shreds or wide but flat shreds. I used an inexpensive mandolin (kitchen slicer/grater set similar to the one pictured below) I bought for a mere P100.00 in Sta. Cruz. (I use this same tool when I make pancit and I am able to get shredded/sliced carrots, chayote and beans in jiffy.)
(I got the kitchen slicer picture here.)
5. I was in a hurry and wasn't able to take pictures while cooking. To see step-by-step pictures, you might want to visit ThaiTable.
Labels:
Salads,
Thai,
Vegetables
Subscribe to:
Posts (Atom)